How to present at online meetings and events like an Ignite Superstar
Introduction
Most of you probably saw some images in a blog post or tuned in for some sessions at Ignite a couple of weeks ago. There was a clear difference in production value compared to what we all saw at Build in May of this year and the Microsoft superstars had made a big step in terms of presenting to a virtual audience.
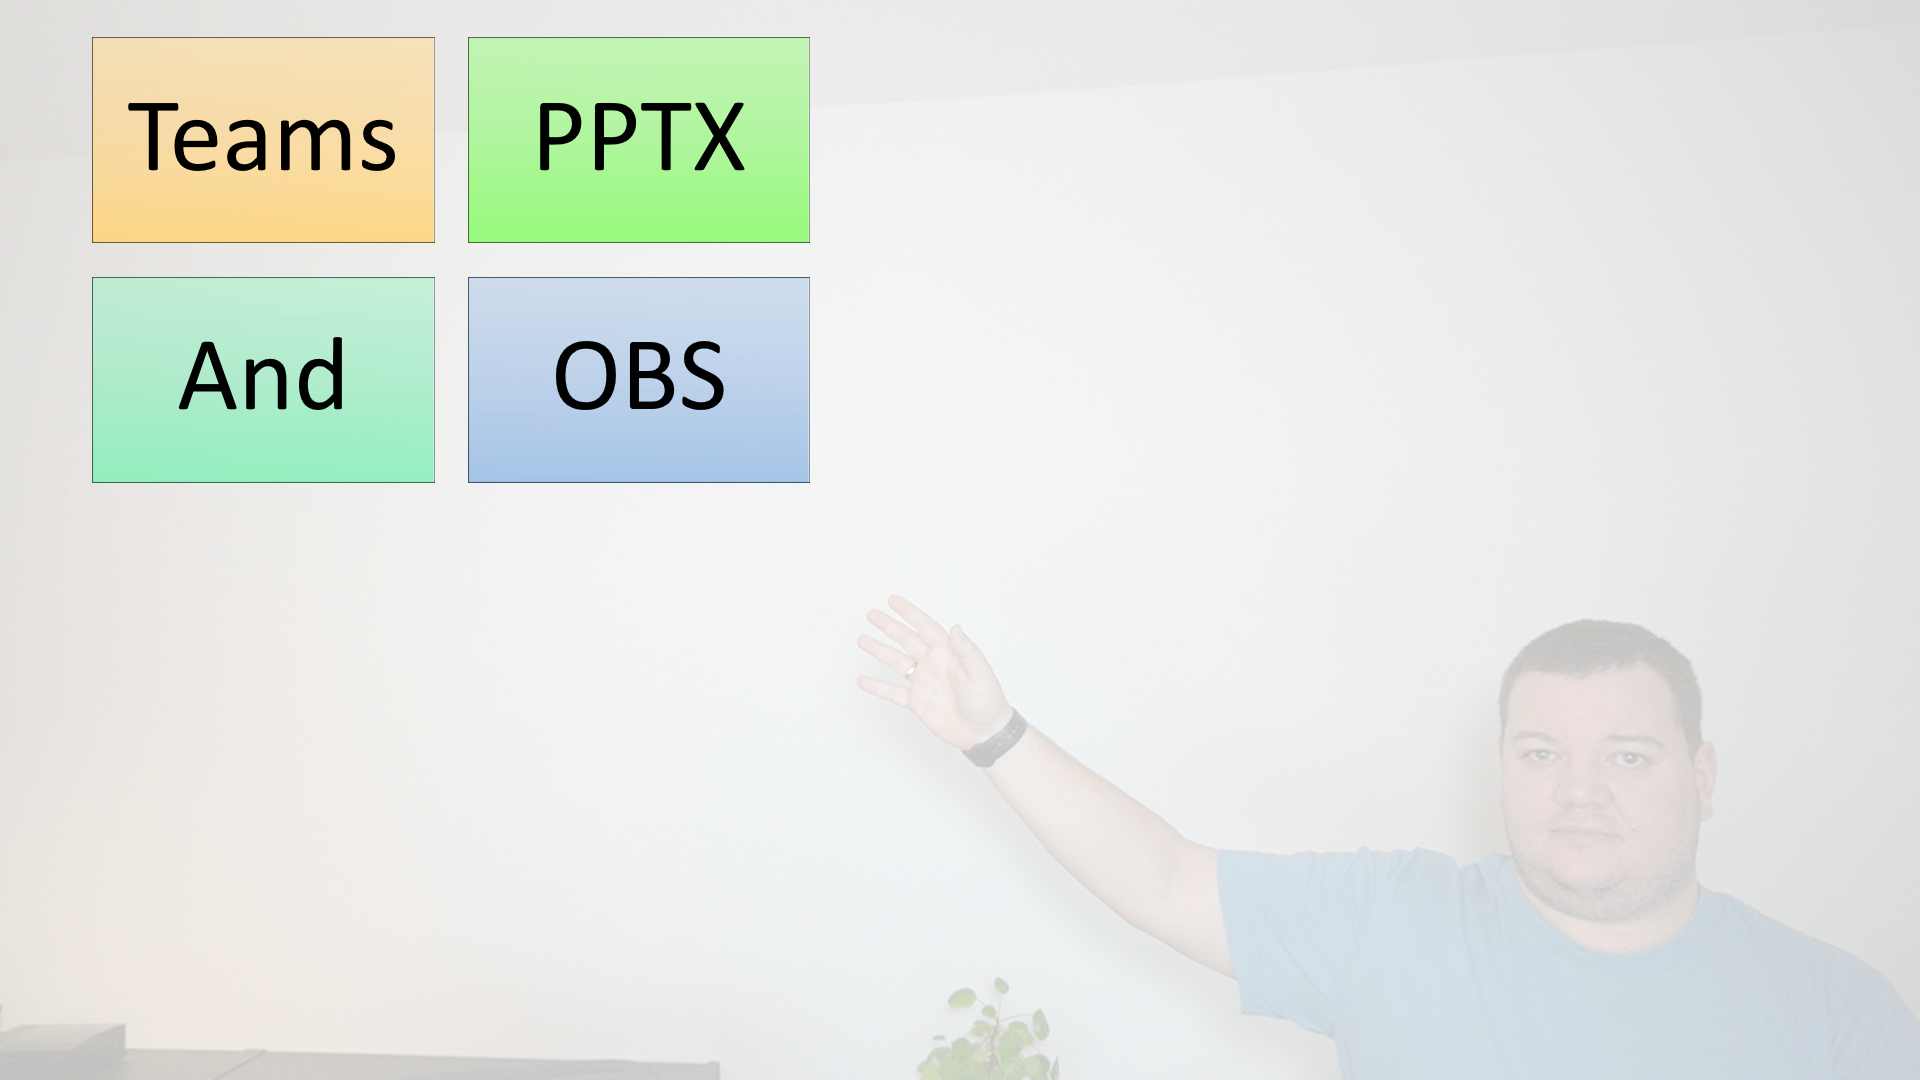
If you look at keynotes at those big events with a big audience in a conference room you are pretty sure that you will never be able to recreate this setup at home. With everything being virtual at the moment we can challenge that assumption. We start by a simple question: Can you turn your next Teams meeting in an Ignite-like keynote presentation?
If you start to research how to create such an experience, you might think one needs a massive production team and seemingly endless hours of preparation to be able to create visuals like that on your own. In this post, I want to show how you could get very close, presenting like Jeff Teper or Scott Hanselman do in their sessions.
But first, a big disclaimer. I’m not an Ignite superstar and in no way shape or form do I have concrete knowledge of what the Ignite team used in terms of technology. I tried to create experiences that come pretty close to what we all saw in September. Jeff Teper and Scott Hanselman showed some of their tools and hardware in different blogs and tweets. You see them post equipment from their home office, like Jeff’s example for Microsoft365 Saturday Ottawa.
OBS - Open Broadcasting Software
We learn from posts and videos that Scott Hanselman uses OBS - Open Broadcasting Software for his content creation process. He refers to another colleague within Microsoft, Jeff Fritz, who hosts his live coding channel on Twitch. Jeff Fritz has a Github repository with some tools and bots to create the visuals, bots and overlays of his stream.
If you are not familiar with OBS (https://obsproject.com/) it makes sense to open up YouTube and watch some basic tutorials. If you heard the term “Twitch” for the very first time in the last paragraph, you might want to ask your teenage kids or relatives. Chances are, they are quite familiar with the platform used by streamers all around the world to most of the time stream their online gaming efforts.
Scenes in OBS
For the sake of simplicity, I would like to suggest we think of OBS like some tool we can use to generate screen output that we then can share on our Teams Meetings. OBS’s primary use case is to stream or record content, but our use case is to present live in a meeting as well. The other main thought is that it helps that you think of OBS like a photo editing tool that has a vast amount of layers that all flattened together to create the final image.
Same is true for OBS. We take a screen share of a program or a full screen and add the video of a camera to the “scene”. To present the content more pleasantly, we can use graphics, images and text to create our final experience.
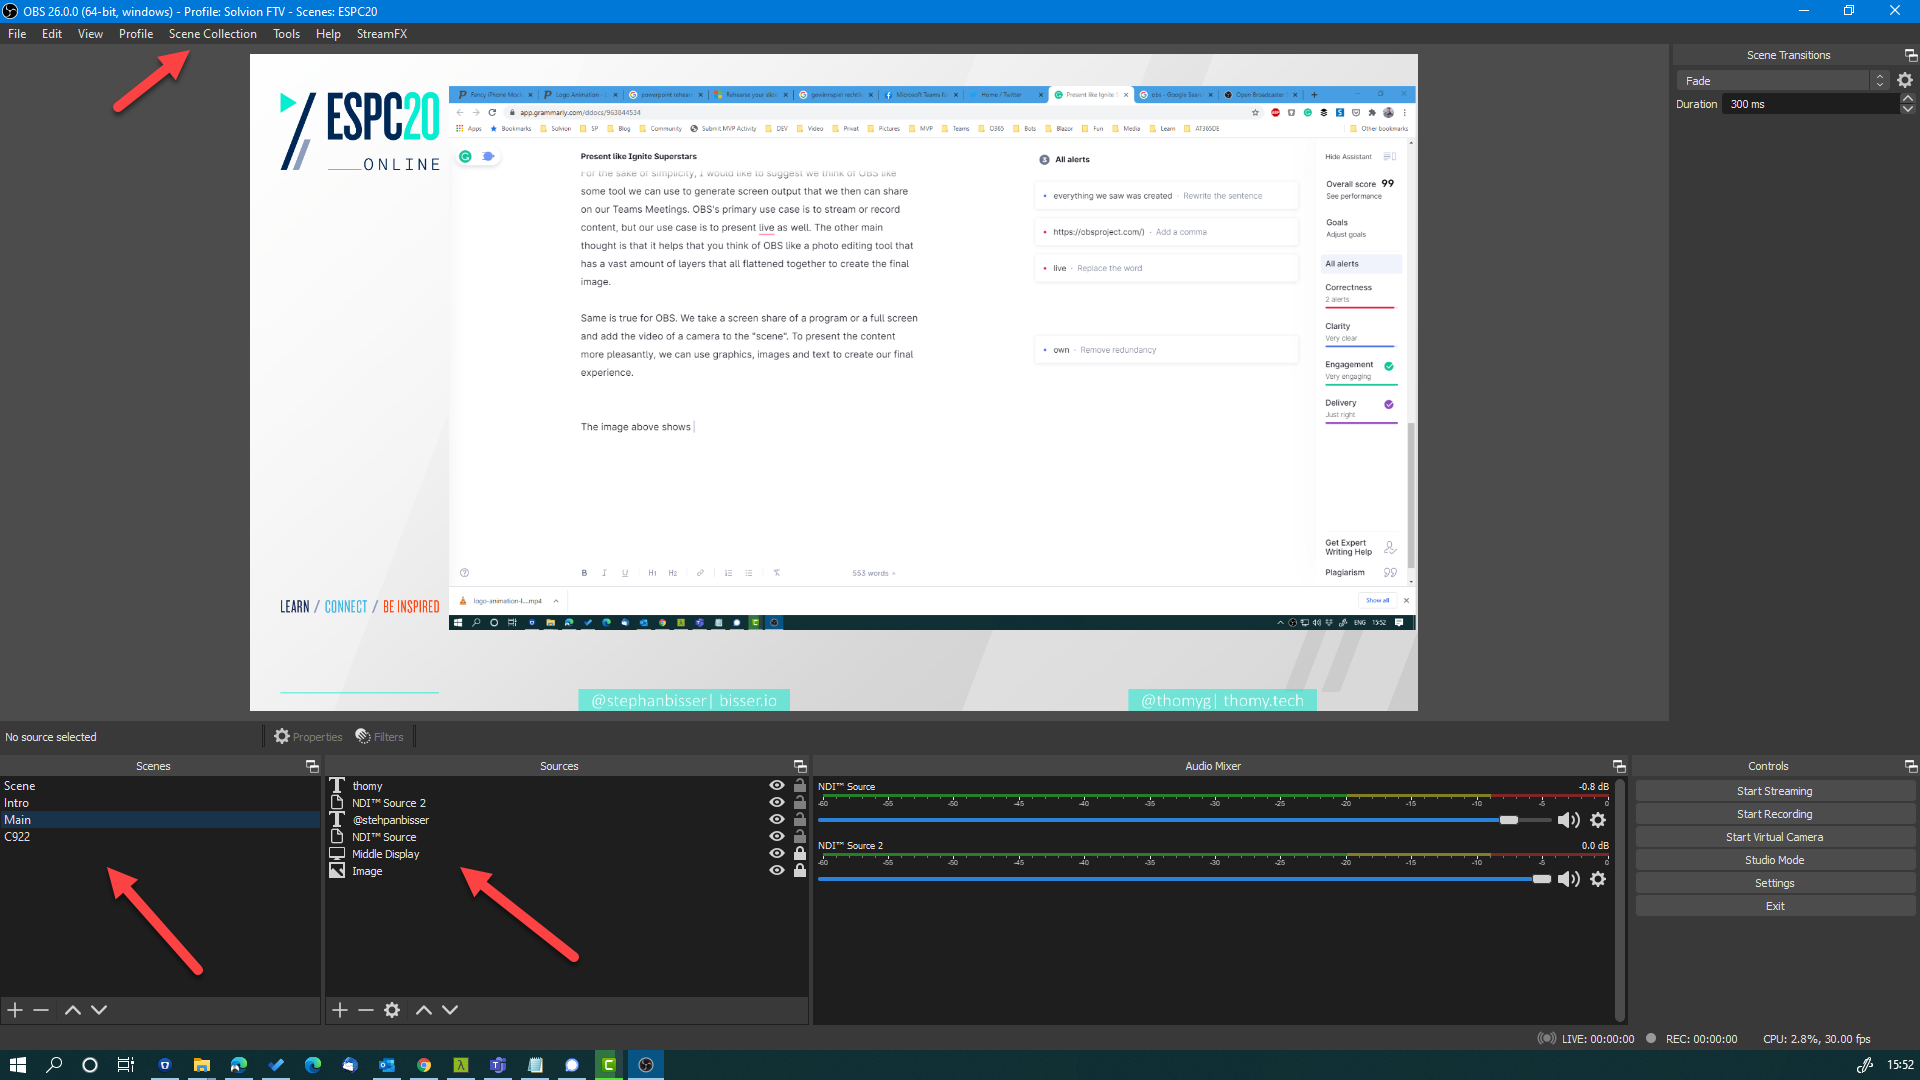
The image above shows the scene Stephan Bisser and I used to record our ESPC20 session earlier this year. On the left is a list of scenes, all grouped in a scene collection for easier management. Next to that is a list of sources with all the different elements present in the final video. This time we made use of Teams NDI feature to take the video feed from a Teams meeting and reuse it in OBS. A technique explained in all details by John Moore on his YouTube channel.
If you watch the tutorials from John Moore and Scott Hanselman you will get up to speed quickly. I don’t want to repeat their work, so please make sure to get the basic understanding of how to use OBS with Microsoft Teams from the references mentioned throughout this post.
What we want to achieve
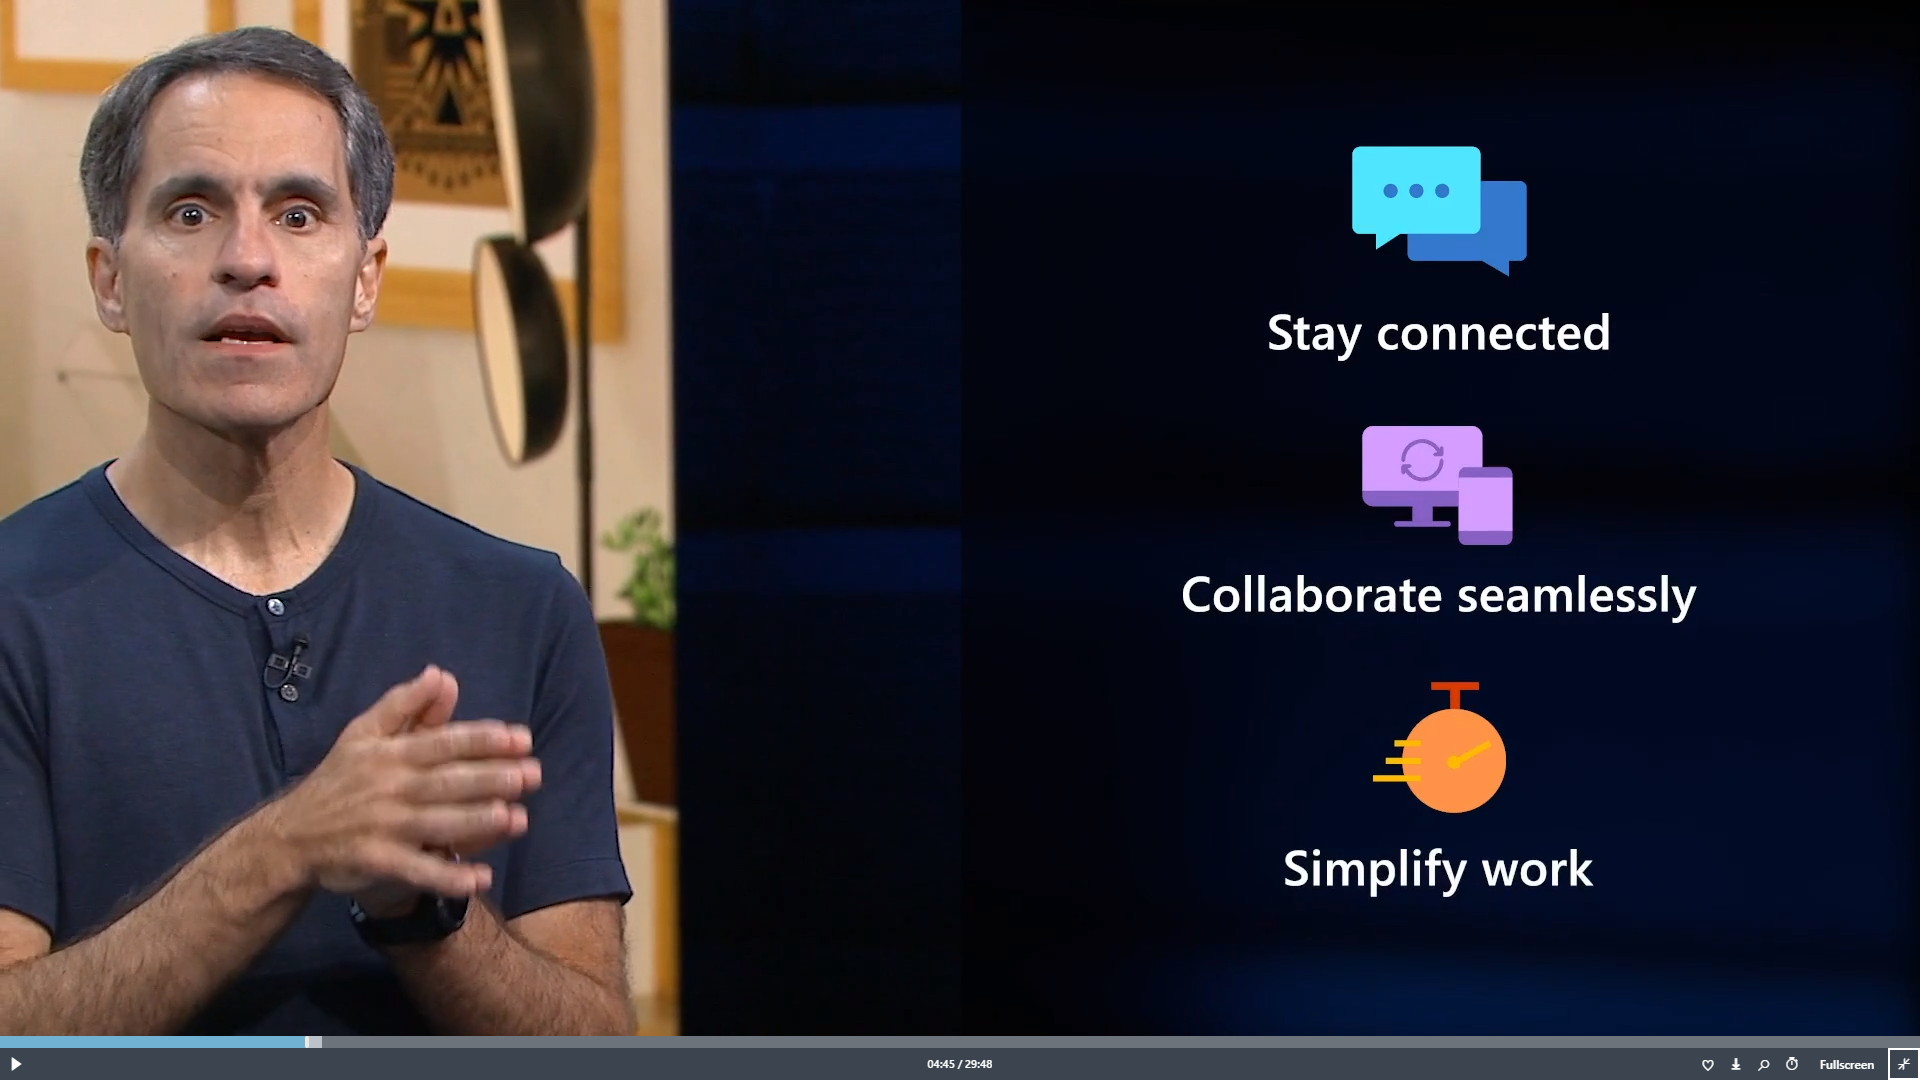
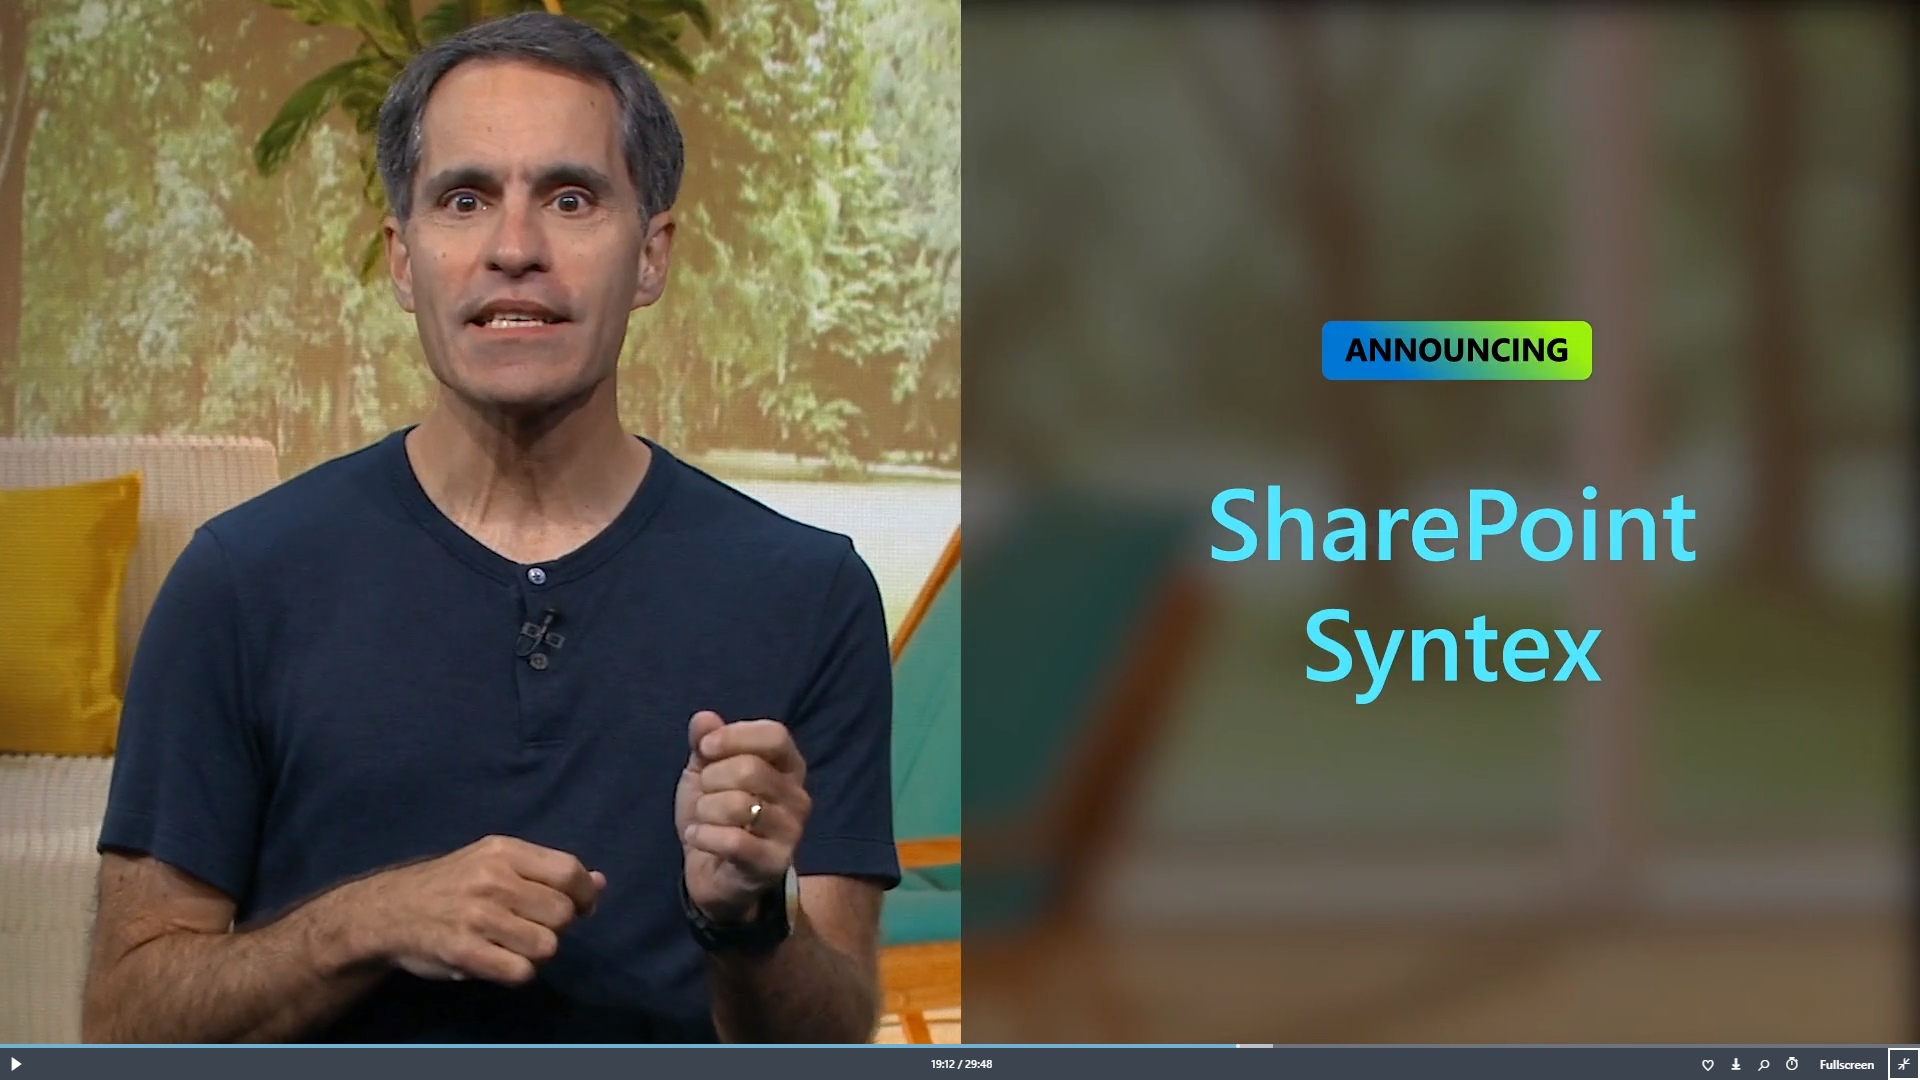
Here you see Jeff Teper presenting at Ignite using what looks like a picture in picture effect. I assume that they recorded everything in a professional studio at Microsoft campus. From his tweets, we know that Jeff uses an ATEM mini at home. The ATEM mini is a hardware video signal switcher. Something like an HDMI hub where you connect various inputs and route the video signal of choice to your computer and OBS.

It has a broad set of features like picture in picture or transitions that allows one to create a professional-looking video. It could be the case that they used features of a video switcher to overlay those elements. Or in case the video was recorded before, it’s relatively easy to add those graphics in post-production.
My target is to create those experiences in a live format, without post-production. Whenever I can, I want to deliver my sessions or webinars live. I have the privilege of not being in the centre of attention compared to top-flight Microsoft people. Or in other words, I can mess things up, and nobody will notice. But more importantly, I don’t want to do post-production what so ever. I don’t have the time for that. When a session or webinar is over, I might share the slide deck or the recording, but that’s it.
Sharing in Microsoft Teams
So how can we achieve this look in OBS in a Teams meeting? Let’s start with the sharing part. As we all know in Teams, we can share an entire screen or a window of a running program. OBS has a nice feature called Fullscreen Projector (Preview). For reference, I’m using version 26.0.0 (64bit) at the moment. This feature allows me to preview the generated video output from OBS on a monitor.
I have a three monitor setup here at my home office. The left monitor has OBS and some tools running. The one in the centre is the screen where everything happens that I want to be part of the content. And the one on the right is the screen I share in Teams. In OBS, I use the content of the centre screen in my scenes and set the Fullscreen Projector to my monitor on the right.

This means I have a full-screen view of the content I share right in front of me. On the left, I have all the tools that help me during my presentation. During a PowerPoint presentation, the presenter view, during a demo part most of the time OneNote or another form of notes. I use the right screen as the preview output from OBS that means I need to be careful not to mix things up and use this real estate. This screen is 1:1 the area I share in Teams, so I use it as a reference to what my audience is seeing. Speaking of audience, in the rare occasion attendees turn on their video in the meeting,
I use the gallery view of the Teams meeting on the left screen. That helps tremendously in connecting with the audience. Human interaction is so much more than just speech and body language. A statement probably never proven right more often than in those video conferencing days of ours.
OBS and PowerPoint
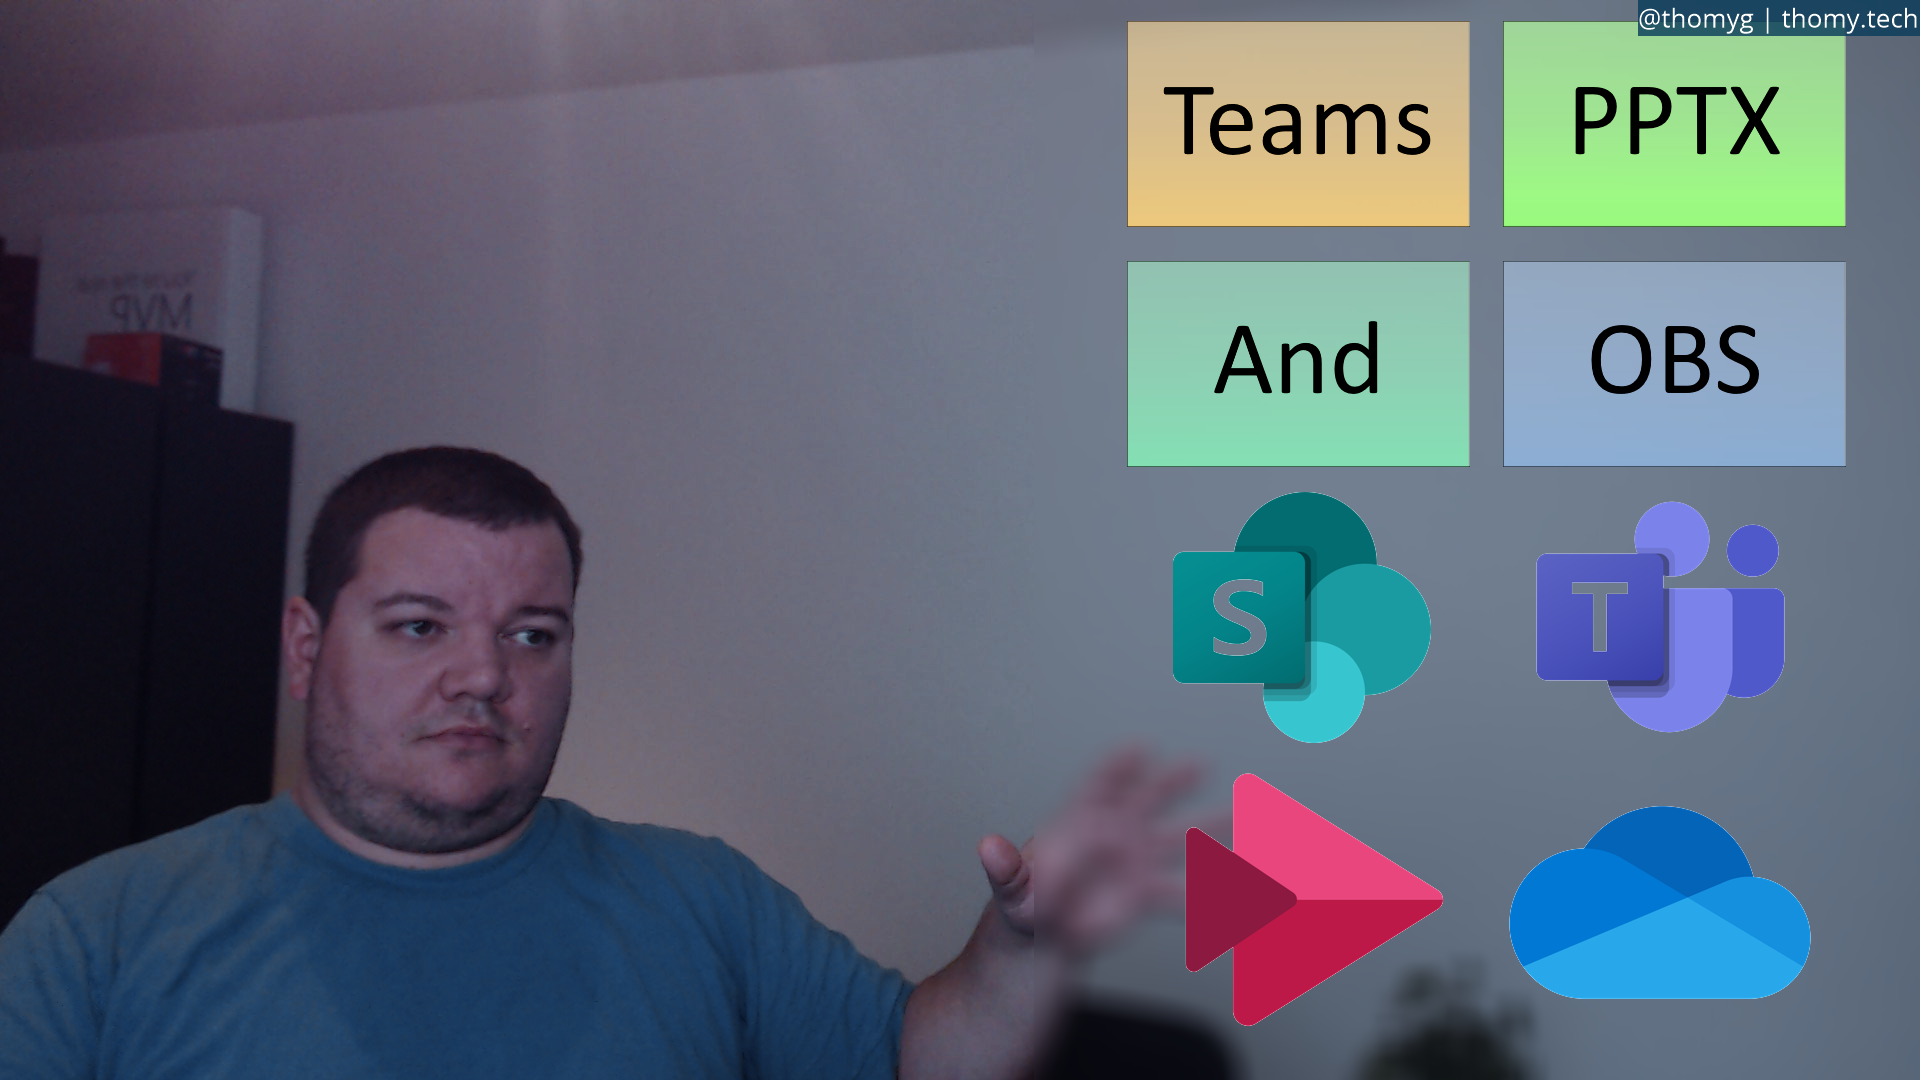
So far we can own the full screen of our attendees and have a way to be part of that screen by using the camera signals and other artefacts in OBS. But how do we combine content and our video like in this image?
To achieve such an experience, we need to fine-tune our OBS set up a little more. Let’s break that up in simple steps. At first, we need to find a way to combine video and content as one. As outlined in the introduction of this post, you can use a video switcher to mix images into your video signal before routing it to Teams. That would be one option, but you can also use a combination of PowerPoint and OBS to get the same output.
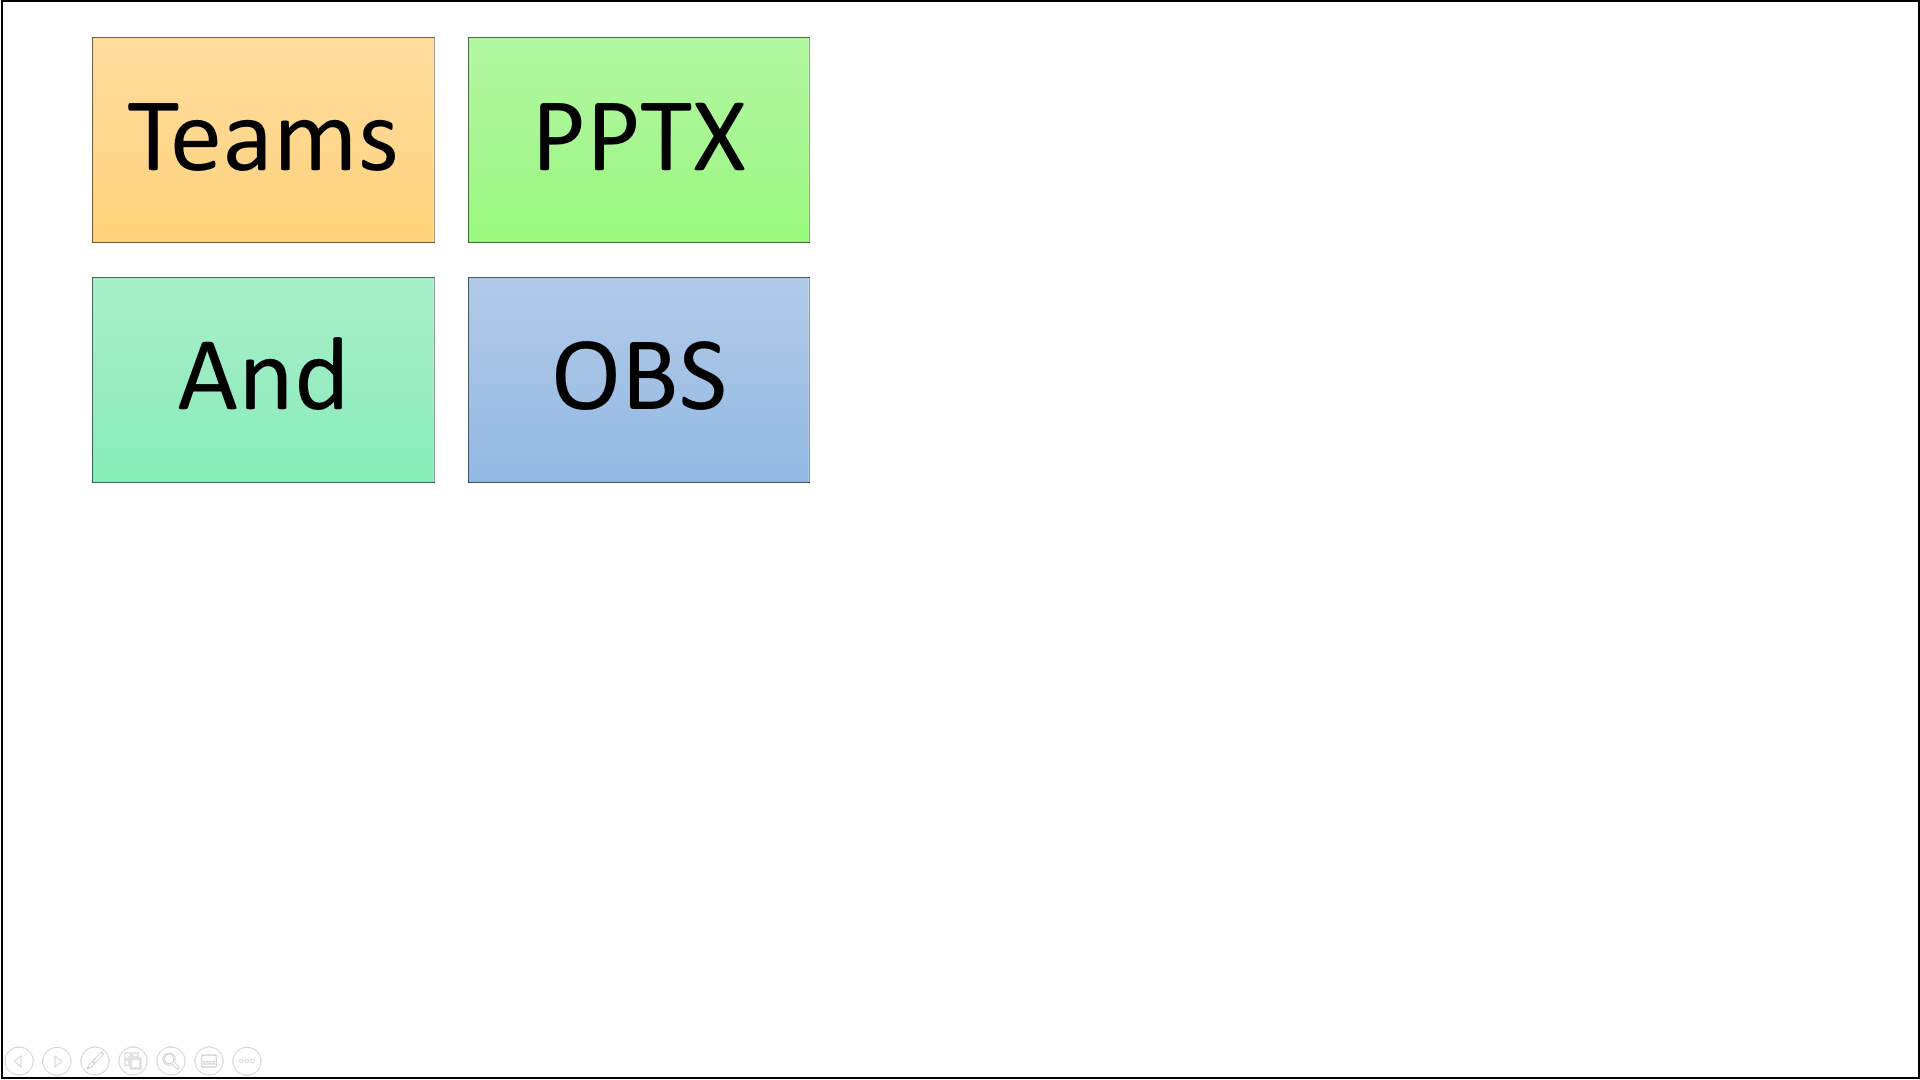
Let’s start with a straightforward PowerPoint slide like this:
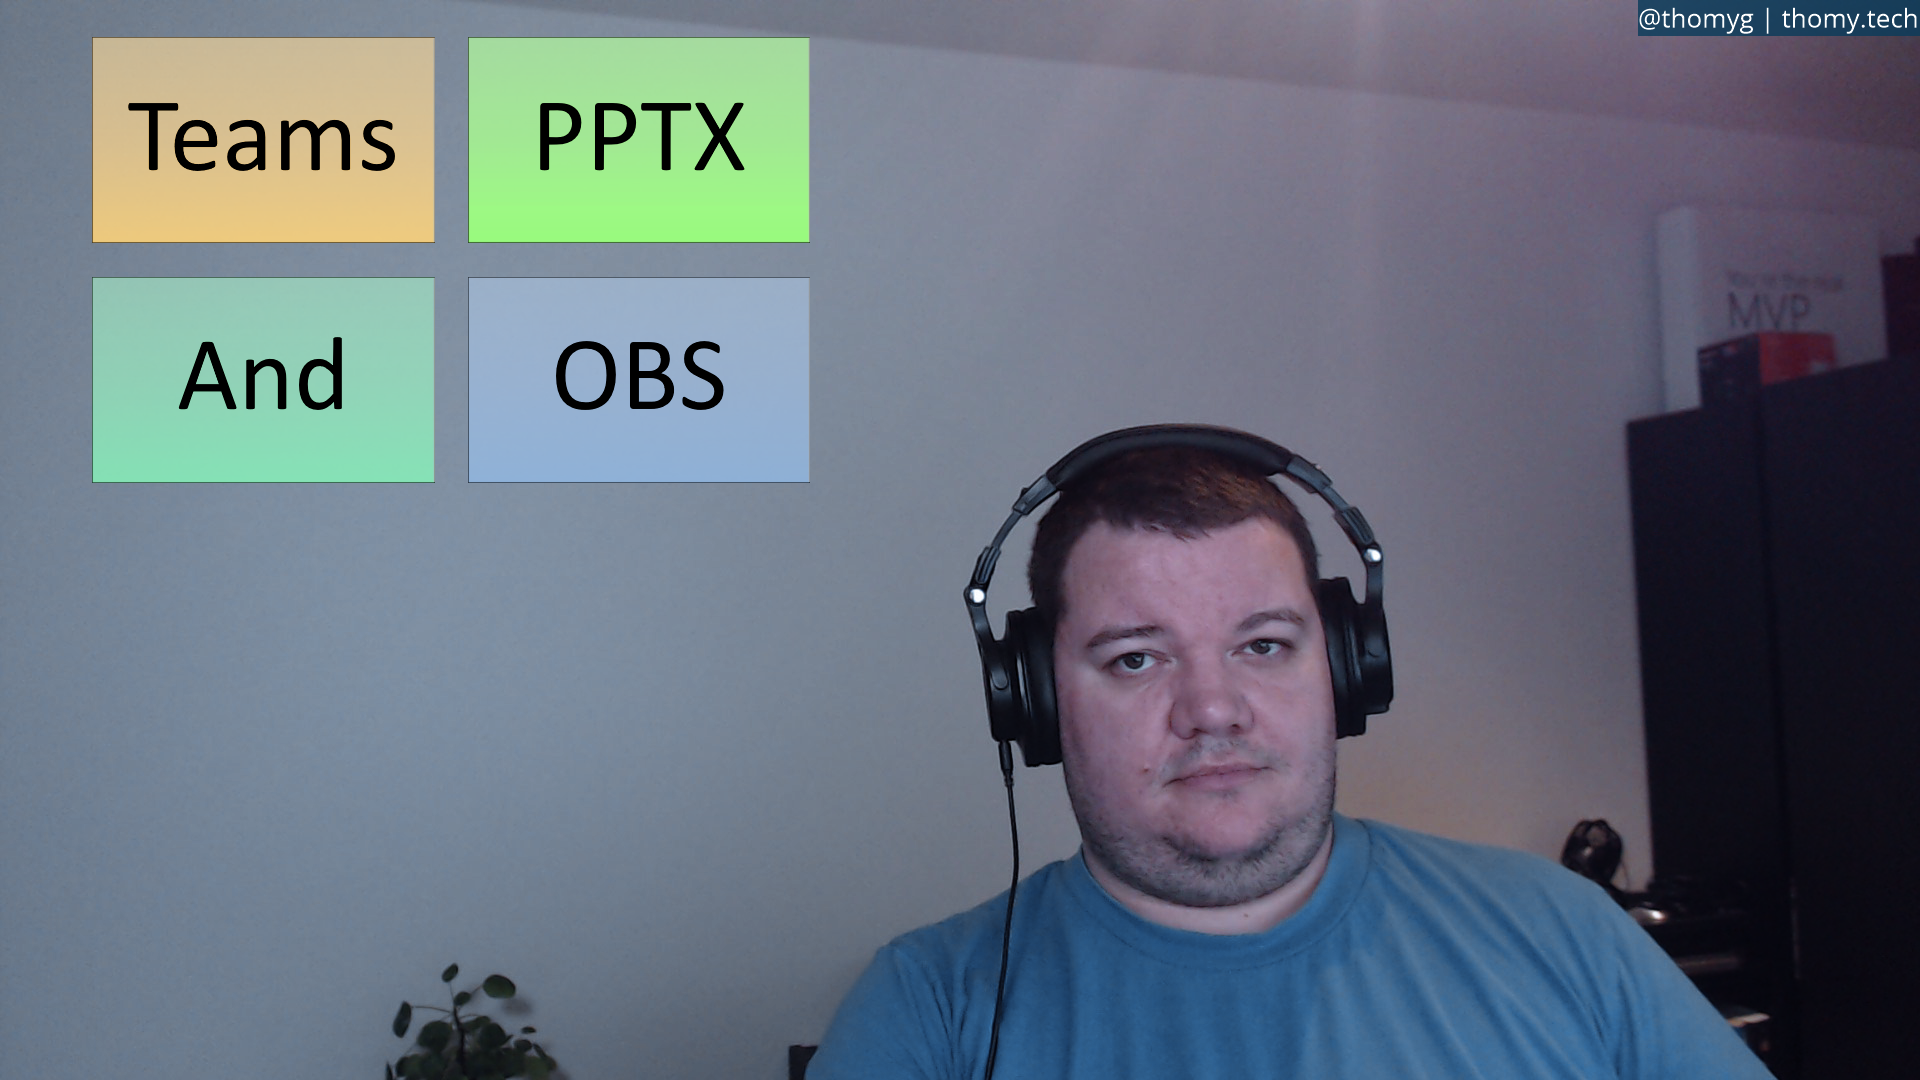
And turn the result in our Teams meeting to something like this:
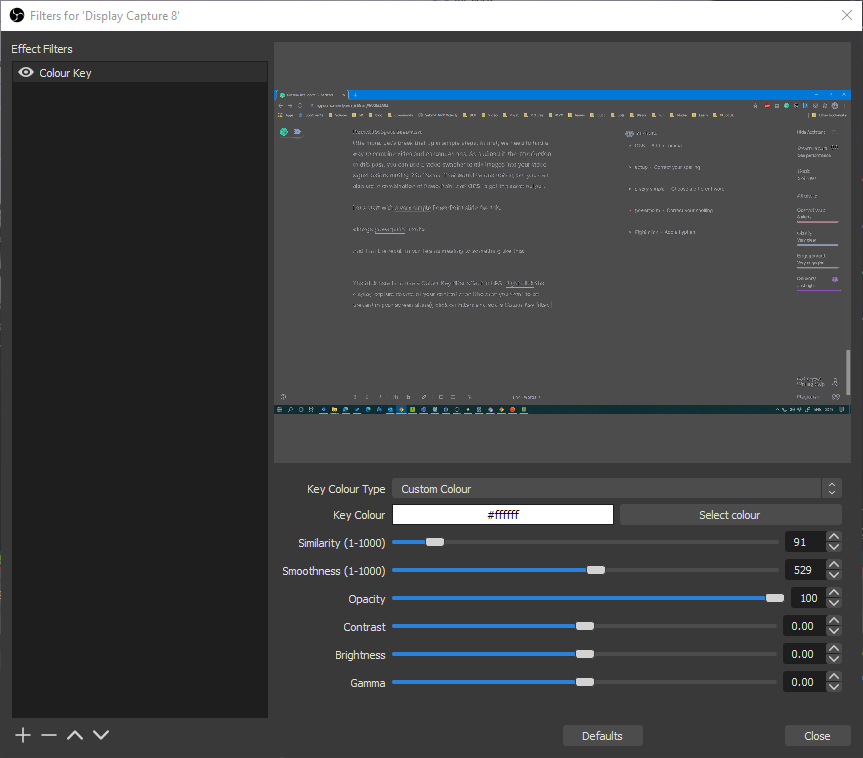
The trick here is to use a Colour Key filter effect in OBS. Right-click the display capture source of your content area (the area you want to be present in your screen share), click on Filters and add a Colour Key filter. Configure the key colour to white and play with settings below until your sharing screen image matches your expectations. Small changes matter here, and you can play with Smoothness and Similarity to achieve the best possible outcome. The colour key filter removes every single pixel with that colour from your signal in OBS. My background in PowerPoint is plain white, so only the upper right part with the textbox comes through. Next in the OBS layer structure is my webcam. As I put my webcam below the display capture OBS “flattens” those layers together and creates the output we want.
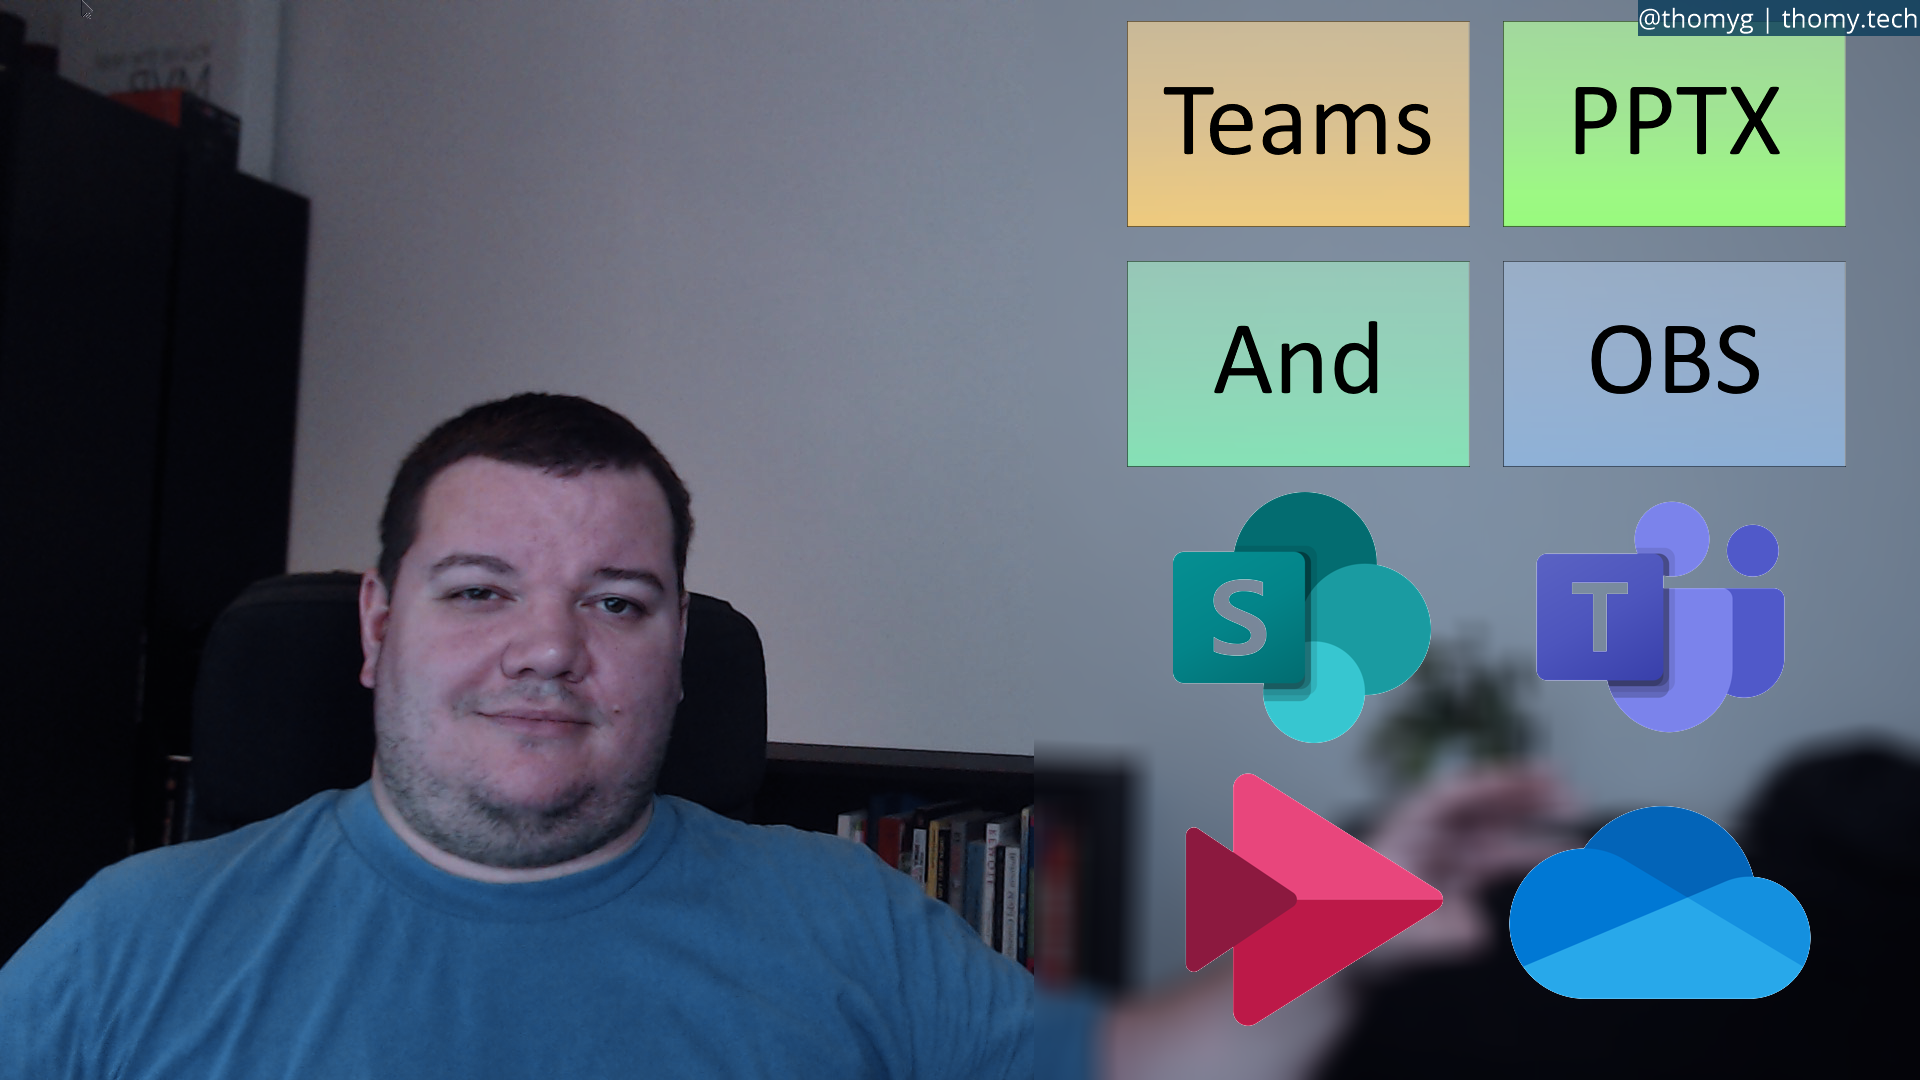
You can use any colour you want and key it out. But after playing around with some, I find white the best to work for my setup. There are two main reasons for this. If you use white as your PowerPoint background, you still can share the deck without the need to change anything. Second, I use the wall behind me as my “white surface”.
As you can see in this image, I can stick to my routine in PowerPoint and assume there is a white background in the presentation. I spent some time using yellow, and although it looks like the whole keying colours out concept is easier to understand if first, you use an intense colour, one does not want to present a PowerPoint deck with a strong yellow background right in front. I found that hard to grasp and work with, but of course, it does work. Again here the slide I used for the above image.
Used hardware
Apologies for not having the best lighting conditions in my pictures. It’s after dark already, and I don’t want to set up studio-like lighting at the moment. I also want to point out, that yes, with the techniques laid out in this post, you might assume that you can create experiences like on a news show. But do we want to compete with professionals on that level? I don’t. I’m ok if my setup is not perfect to the very end. That’s also the reason for not using a green screen or some other form of artificial background. I want my audience to know that I’m presenting from my home. There is nothing special about it, and you don’t need a lot of hardware for that.
All images and screens so far came from my webcam, a Logitech C922. Of course, you can achieve better image quality by using a digital camera and connect it to your PC, but the point is, you don’t need to. I am a gadget guy and buy all sort of things to try things and play with the latest tech. But most of the time you can get almost close to, let’s say 85% or even 95% with less expensive investments.
What I find more and more important in my setup is my stand-up desk. It allows me to put my cameras at a certain height where you don’t see anything but the content. This image is the same PowerPoint slide, but the camera used is my Sony sitting on a tripod on my desk.
This is my preferred presenting look. You can read the slide in top quality and still see me in what looks like the background. The impression I try to create is that I’m part of the content, but not in focus. I can use my hands to point at things, and I can walk around a little bit, something most people would do in front of an audience in real life.
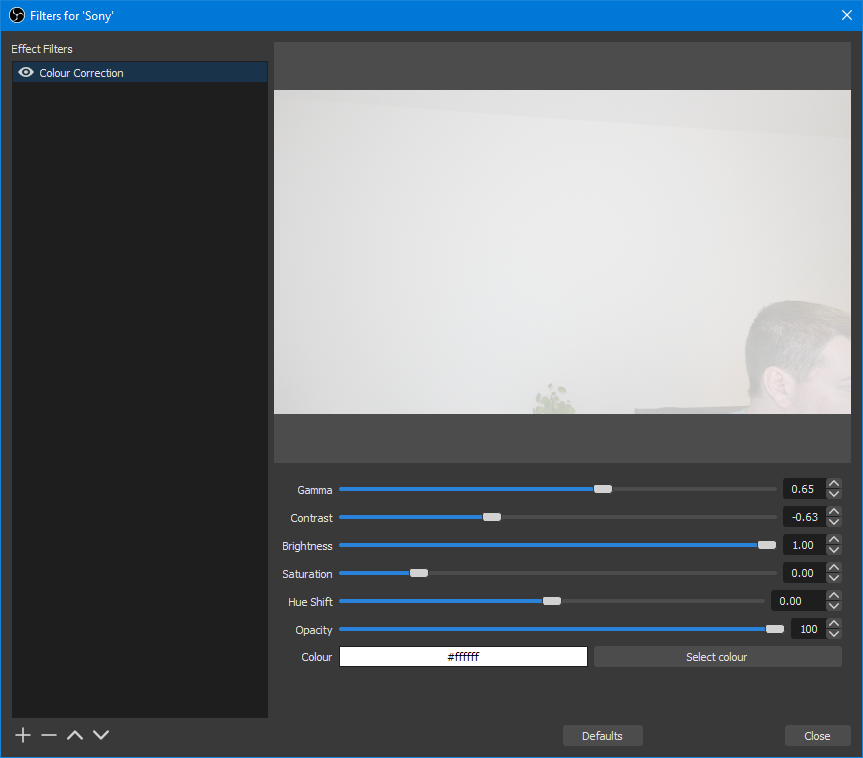
The “background effect” is a simple Colour Correction filter in OBS applied to my camera signal. I’m intentionally blowing out the image by turning up the brightness to 100%. But that’s just what I do, and you don’t need to follow every step in this tutorial. I even would like to say: don’t! Be creative and use the settings in your favour to create the video signal you feel most pleasant for your attendees. But don’t forget, presenting is about what the audience takes away from your talk and not how good you feel by using geek filters or tech gadgets.
“Half-Half blur”
We now have a combination of our presentation and ourselves on the screen we share through Teams. It’s time to introduce the “half-half blur” technique used at Ignite.
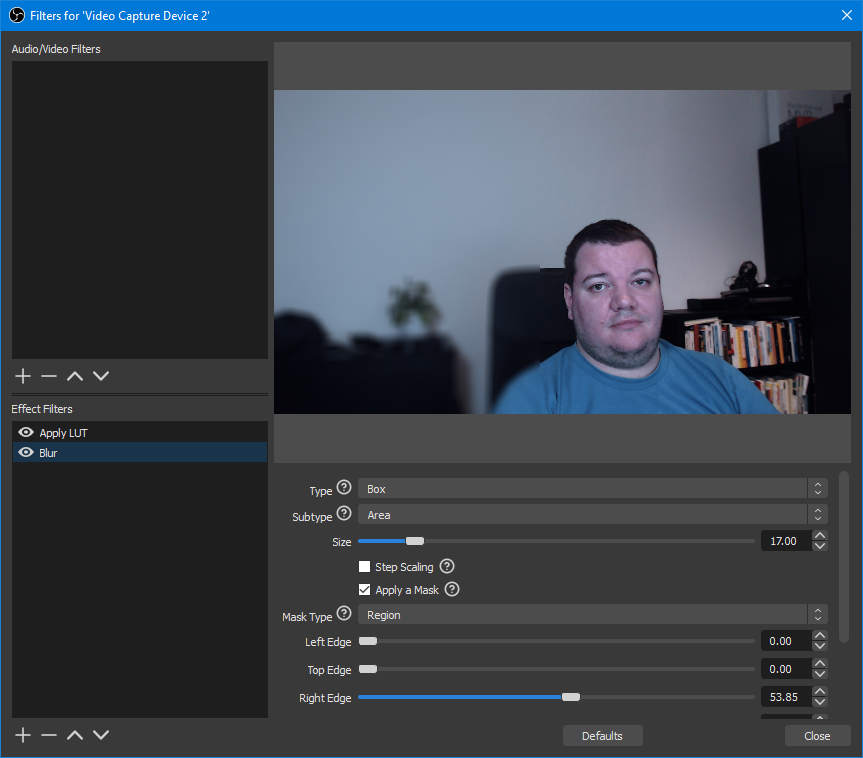
As you see in the screen, my background is already clean, almost so clean that the blur effect added through a filter is barely recognisable. Let’s move the desk down again in a sitting position to get some stuff in the background.
This effect is part of a plugin of OBS called StreamFX. To use this plugin, you need to download and install the bits. After that, you can add a blur filter to the source of your video capture device. I’m using the Mask Type “Region” and start the blur effect from the right and go almost a little over the centre with 53,85%. That again depends on your background and your environment.
With that, all you need to present like the rockstars from Ignite is content. What changes from a standard in-person PowerPoint presentation is the need to plan your slide deck through. You are part of the presentation now, so you one needs space in there as well.
Think of where you want to position yourself in the frame. Play around with the settings. For example, I’m flipping the video signal of my camera horizontal. That helps when using your hand to point at certain things. Without flipping, left is right and right is left. I got confused during presentations without that change. But keep in mind, everything in your camera frame is mirrored. Be careful with text in the background or on clothes; this starts to look wired very fast.
One more thing
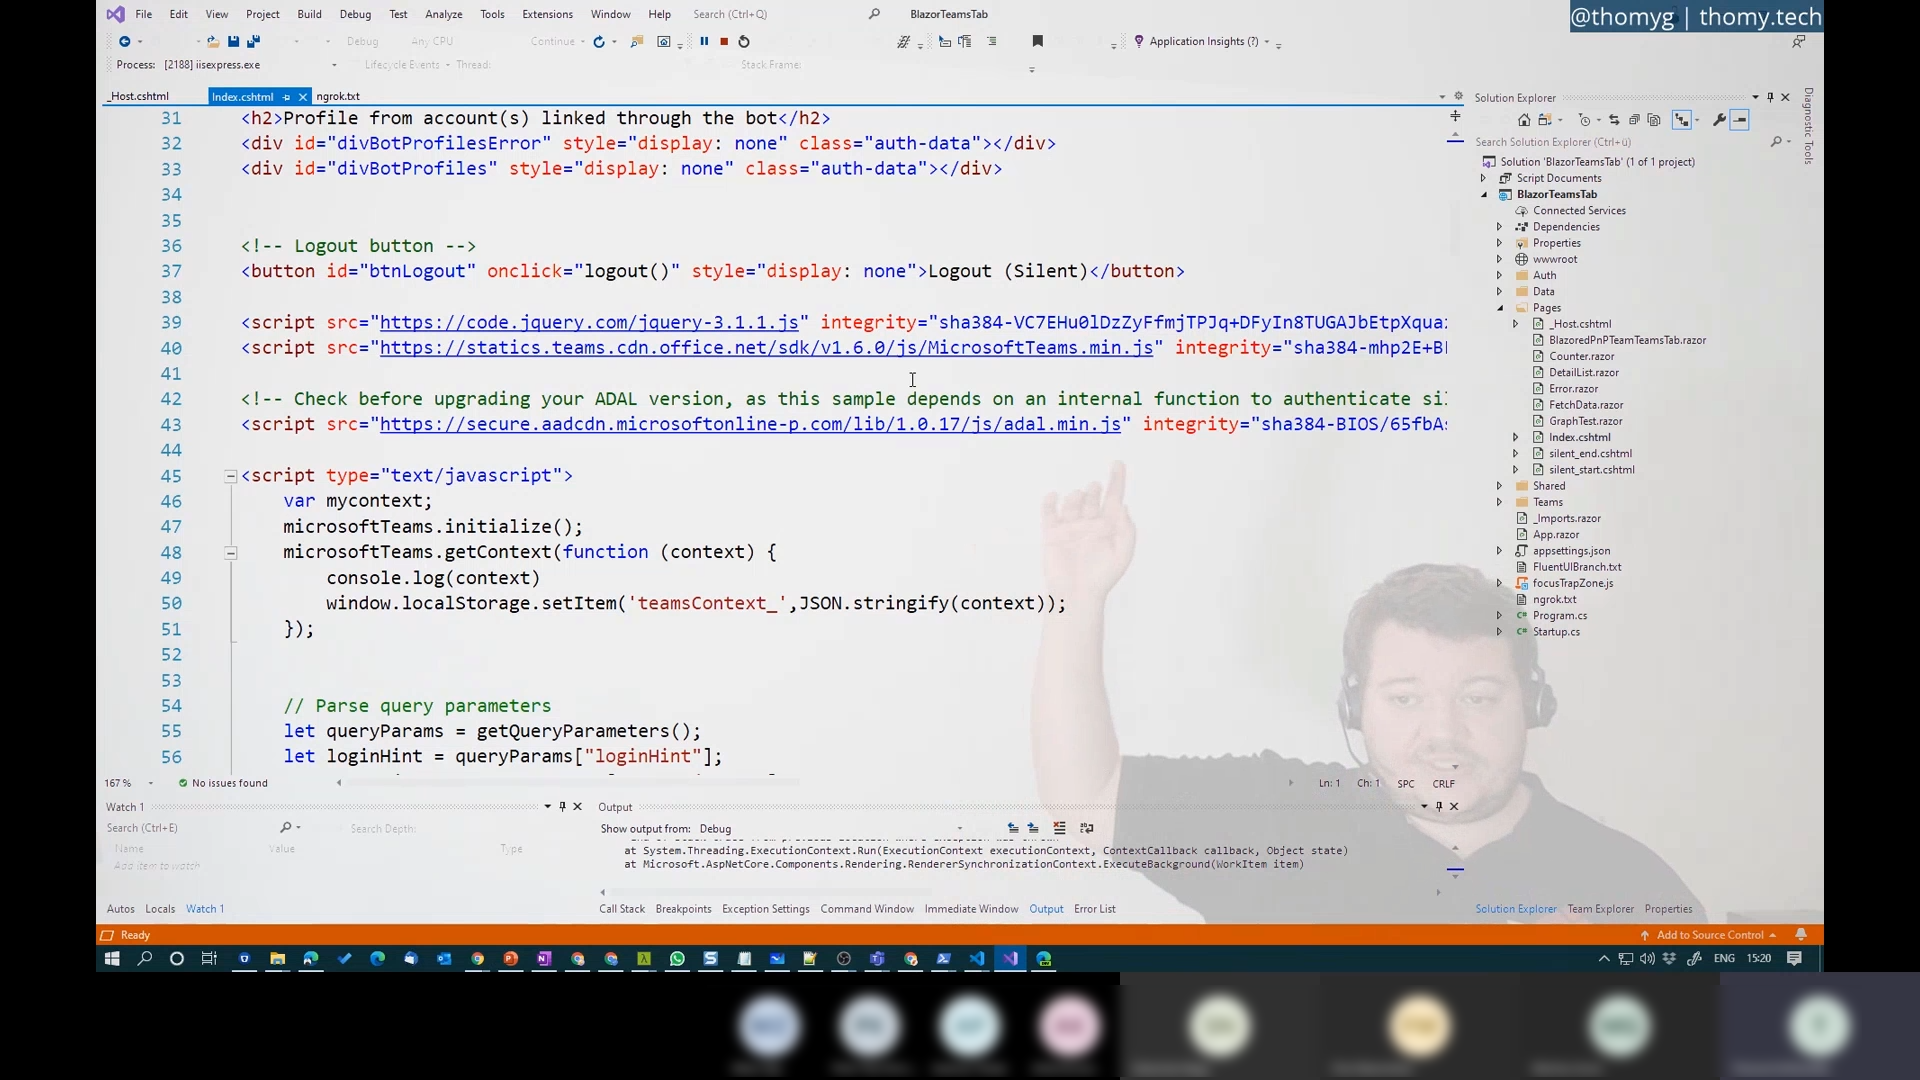
But there is one more thing. The concept of keying out specific colours isn’t bound to PowerPoint. The filter removes everything white in whatever is on my centre screen. Let’s talk about using ADAL for authentication in a Blazor Web Application for a second:
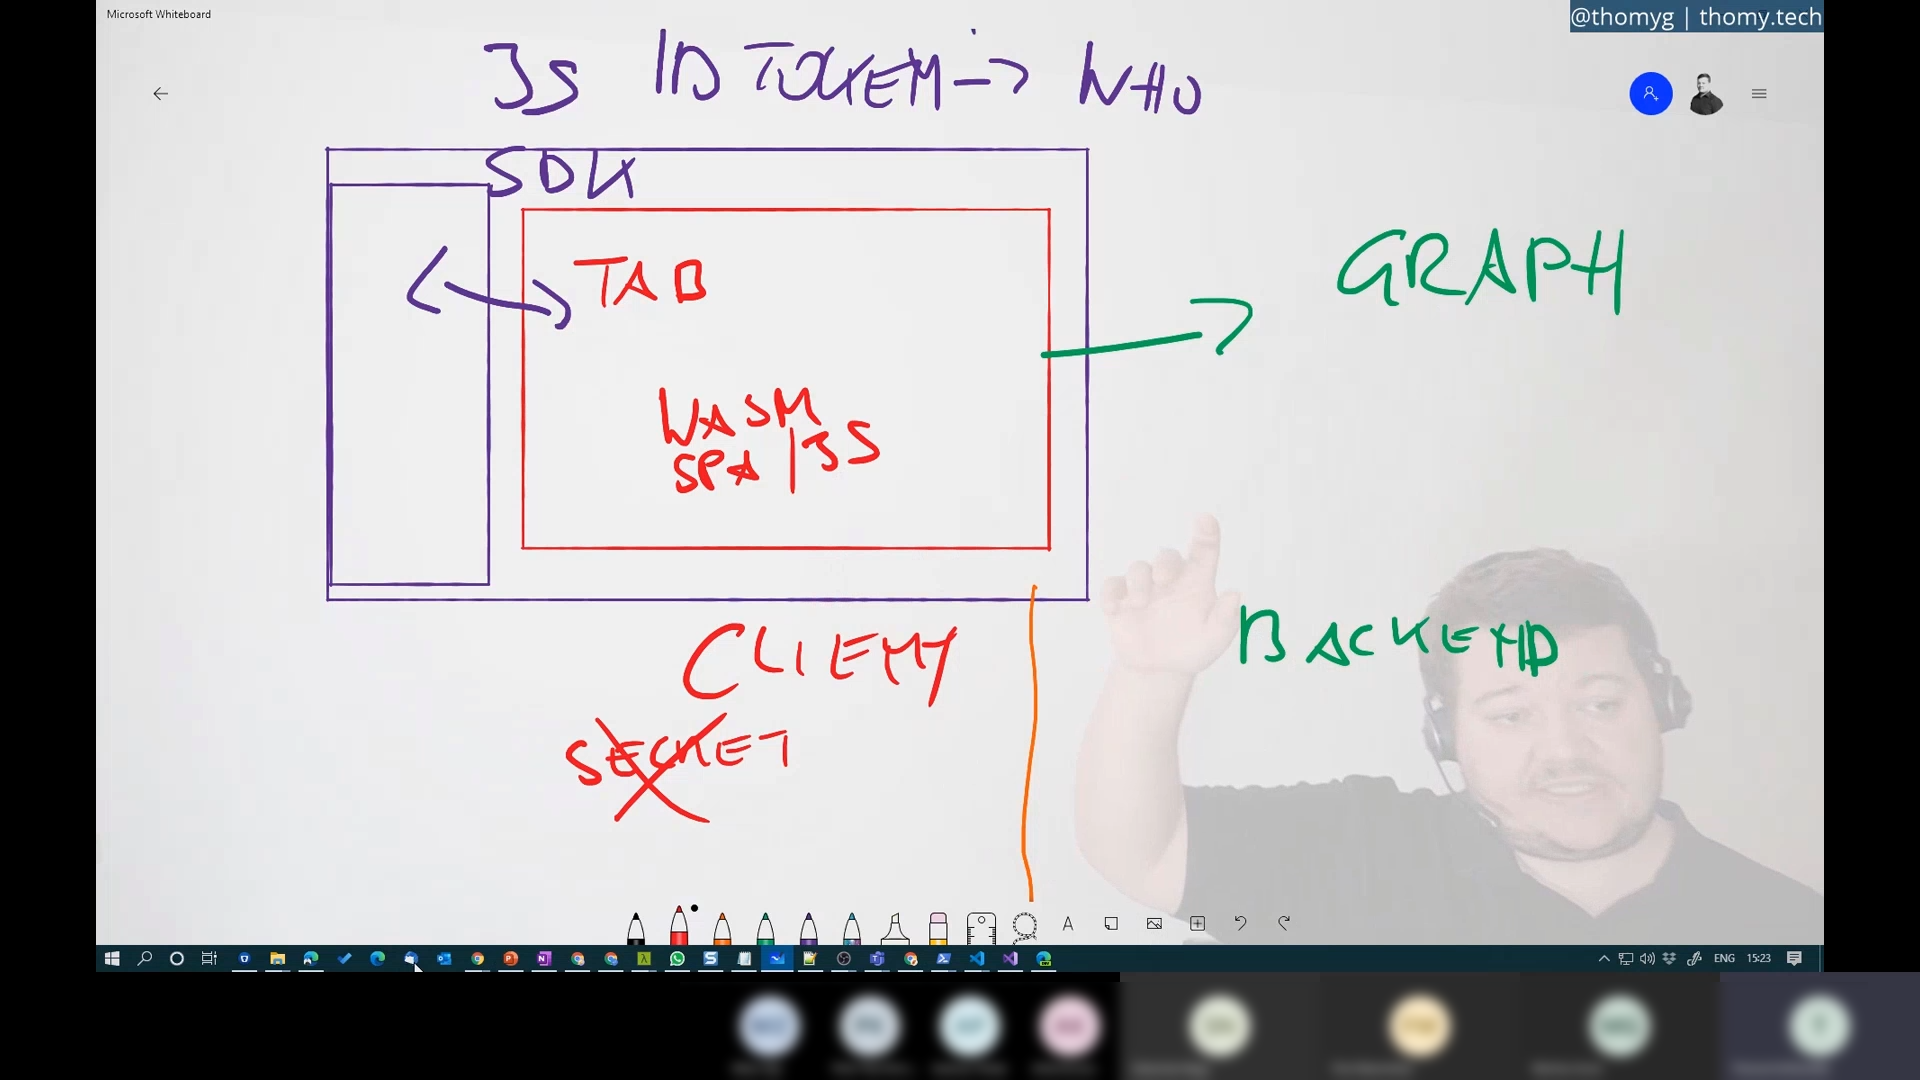
Or you can use Microsoft Whiteboard to sketch out an idea and be part of that experience as well.
As you start thinking of a possible presentation using these techniques, you might begin to realise that one scene in OBS doesn’t quite cut it. You most probably need multiple of those to run a smooth presentation that isn’t just a visual one-trick pony. If you stay within PowerPoint, I highly recommend checking out this post by Scott Hanselman introducing a small program he created to sync OBS scenes with your PowerPoint deck. He calls the built-in webserver of OBS to switch to a specific scene whenever his tool detects a slide change in PowerPoint. This allows you to use a clicker or presenter tool of choice to move forward with your slides and OBS automatically adjusts the output to be in sync.
I’m using stream deck buttons on my desk to switch between the different scenes at the moment. I’m walking around the room if I need to explain something that is part of my PowerPoint and go back to the desk for a short demo. To switch video signals, I press a button on stream deck, and off we go.
I hope you found this post useful and wish you all the best for your next online presentation! If you have any questions, feel free to contact me on Twitter, LinkedIn or by mail, whatever you prefer.
Enjoyed this post? Let's connect on LinkedIn:
Follow on LinkedIn →
