
10 things you should do with your Office365 demo or dev tenant
In the last couple of months, I needed to create a few demo or development tenants in Office365. As I don’t want to reinvent the wheel all the time, I created a list that steers me through the process and makes sure I don’t forget an important step. As you probably know, ticking things off a todo list can be a very satisfying activity. So the next time you need to create a development or demo tenant think of this list, copy it to your todo app and enjoy the good vibes while ticking off the boxes of your own 10 things.
1 Sign up for a development or demo tenant
First of all, we need a working tenant. There are quite a few options to get to a test or demo tenant. My typical starting points is the Office365 Developer Program (https://developer.microsoft.com/en-us/office/dev-program). This portal combines all things to get your development efforts started and adds training resources and event information as well.
My other major starting point is the Office365 E5 trial subscription form at https://aka.ms/e5trial. If you are a member of the Microsoft Partner Network, there might also be other options depending on your relationship with Microsoft.
Update: Chris O’Brien mentioned one important additional source for Microsoft partners https://aka.ms/cdx where CDX stands for Customer Digital Experiences. This is the portal for partners to create what is called the Customer Immersion Experiences with different types of tenant templates, playbooks and general help on running your demos. Thx for your comment Chris!
2 Choose English as your tenant language
Depending on the program you choose, you may or may not need to sign up first to the program with an email address. For the demo purpose of this blog post, I signed up to the developer program with a new email address. I highly recommend creating your tenant in the United States or at another English speaking country. The latest and greatest stuff from Microsoft and the community often depends on English as your tenant language as multi-language features are regularly not in the top priorities. You can change your user language or the language of your SiteCollections later on, but you will never be able to change the root tenant language. I’m German-speaking, but I use an English version of Windows with an English version of Office for more than ten years now. It’s just more comfortable, and less pain included.
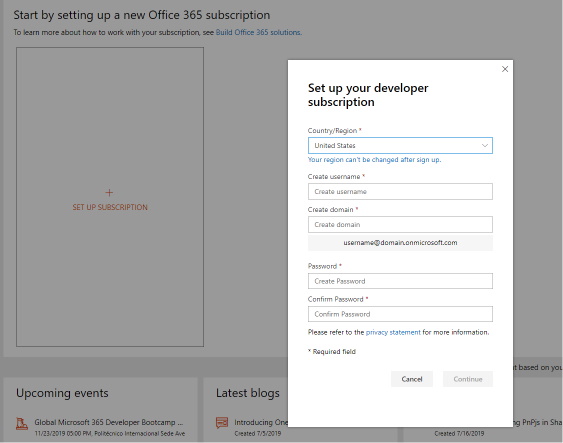
For the domain part of your tenant, I tend to use “test4” followed by the real target tenant URL or customer name. It makes your test and development efforts more recognizable and helps to categorize the questions that might hit you on the same day from the production and test tenant.
3 Enable multi-factor authentication (MFA) for your admin user
By now, you should be able to login to your new tenant, and we can start with the basic setup. You might think this is a little bit over the edge for a test or development tenant. But as soon as I work with customer data and demo data is already customer data, I rather play it safe and secure my account accurately.
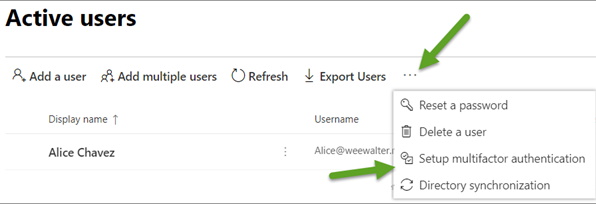
This link guides you through the setup of MFA in Office365 https://docs.microsoft.com/en-us/office365/admin/security-and-compliance/set-up-multi-factor-authentication?view=o365-worldwide. It takes you only a couple of minutes and should at least be done for your tenant admin accounts.
4 Create an App Catalog and set everyone to “Targeted release for everyone”
As we are going to deploy demo data and apps to our tenant, we need a working app catalog in Office365. Follow the steps at https://docs.microsoft.com/en-us/sharepoint/use-app-catalog to set everything up. I always use “appcatalog” as the SiteCollection name as it just simplifies stuff along the way.
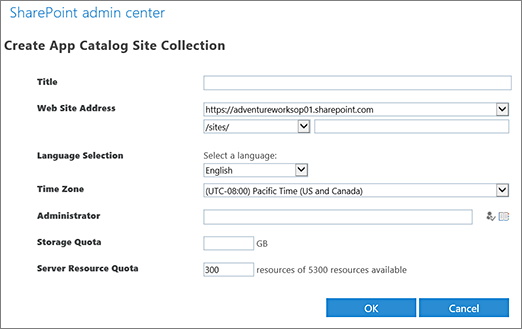
The provisioning of the app catalog takes 15 to 20 minutes. To streamline your time effort, it’s already number 4 here on the list. Technically you will need the app catalog at step 8. But we can already make the next steps during its deployment.
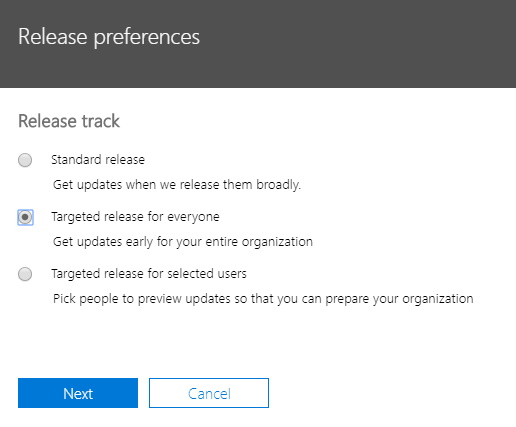
Some of the examples, we are going to deploy later, need the newest bits to be present on your tenant. Therefore we need to configure the release preferences of your tenant. Follow the steps add https://docs.microsoft.com/en-us/office365/admin/manage/release-options-in-office-365?view=o365-worldwide#set-up-the-release-option-in-the-microsoft-365-admin-center and set the setting to “Targeted release for everyone”.
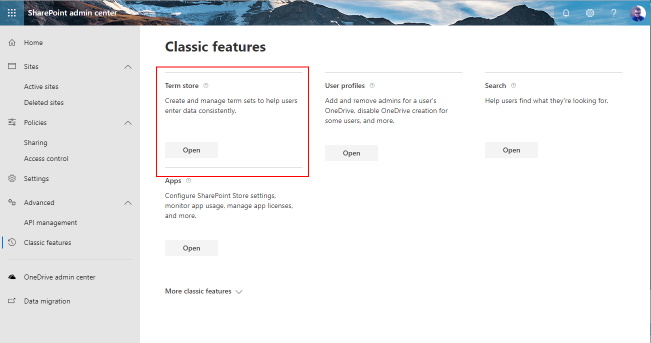
5 Add your user as an admin to the Managed Metadata Service
When you deploy your tenant, certain base services are created in the background. One of them is the so-called Managed Metadata Service or short MMS. The service is the central point for your tenant-wide metadata. You need to add your user to the, so far empty, Term Store Administrator list. This is a prerequisite for the demo content we are going to deploy in step 8. Follow those links for a detail description on how to add administrative rights. https://docs.microsoft.com/en-us/sharepoint/assign-roles-and-permissions-to-manage-term-sets & https://docs.microsoft.com/en-us/sharepoint/open-term-store-management-tool
6 Add test or demo users via script
We are going to use a CSV file and some lines of PowerShell to create users in your tenant and assign them the correct license. I got the idea from this YouTube video but have added more steps to the process.
https://www.youtube.com/watch?v=DT-G2V8E1Zc
Follow the steps at https://docs.microsoft.com/en-us/office365/enterprise/powershell/connect-to-office-365-powershell to install the Azure Active Directory PowerShell for Graph module and the Microsoft Azure Active Directory Module for Windows PowerShell module.
\## connect to Azure AD
Connect-MsolService

# Get Sku String for LicenseAssignement
Get-MsolAccountSku

#Add Users
import-csv ./newusers.csv | foreach {
    New-Msoluser -UserPrincipalName $\_.UserPrincipalName -displayname $\_.DisplayName -firstname $\_.FirstName -lastname $\_.LastName -password $\_.Password -PasswordNeverExpires $true -ForceChangePassword $true -usagelocation "at" -LicenseAssignment "test4contoso:DEVELOPERPACK"
}

#Remove Users
import-csv ./newusers.csv | foreach {
    Remove-MsolUser -UserPrincipalName $\_.UserPrincipalName -Force
}

#Remove Users from RecycleBin
import-csv ./newusers.csv | foreach {
    Remove-MsolUser -UserPrincipalName $\_.UserPrincipalName -RemoveFromRecycleBin -Force
}
The PowerShell script here isn’t build to run it at once. I open up the ps1 file in VisualStudio Code and execute step by step by highlighting a line and pressing F8 on my keyboard. At first, we are going to connect to the online service and get the AccountSku. This value needs to be assigned as a parameter to the New-Msoluser cmdlet. Check out the details of this cmdlet here https://docs.microsoft.com/en-us/powershell/module/msonline/new-msoluser?view=azureadps-1.0 to learn about all the options. I like the -ForceChangePassword flag. It allows me to hand out the same initial password to every one of the test group, and still, everyone needs to create his or her very own password.
The script reads input from a given CSV file. You can reuse the sample Excel (columns: UserPrincipalName, DisplayName, FirstName, LastName, password, ForwardingSMTPAddress) or use a simple text editor to create the same content. In Excel, you can even use the CONCAT function to build something like a generator where you just need to enter FirstName, LastName and the domain part. Make also sure to save everything in the correct CSV format (CSV Comma delimited). But as the developer tenant is limited to 25 users, this is easily doable by search and replace as well.
7 Add email forwarding to your user’s main work address
As your users start playing with your tenant, email notifications are sent. It could be a dummy flow that asks for approval or Teams that wants to make sure your users are up to date with what is going on in your channels.
Most of the time, your users don’t open the Exchange Online mailbox of their test account, so we need a way to inform them on the regular route. That’s why we are setting up forwarding SMTP addresses on their mailboxes. This script uses the Exchange Online PowerShell and the same CSV file from step 6 to iterate through all given mailboxes and set the forwarding to the proper work email address of your users.
$credential = Get-Credential

$exchangeSession = New-PSSession -ConfigurationName Microsoft.Exchange -ConnectionUri "https://outlook.office365.com/powershell-liveid/" -Credential $credential -Authentication "Basic" -AllowRedirection
Import-PSSession $exchangeSession -DisableNameChecking

#Add Forwarding SMTP Address for  Users
import-csv ./newusers.csv | foreach {
    Set-Mailbox -Identity $_.UserPrincipalName -DeliverToMailboxAndForward $true -ForwardingSMTPAddress $_.ForwardingSMTPAddress
}

#Check
import-csv ./newusers.csv | foreach {
    $mb=Get-Mailbox -Identity $_.UserPrincipalName
    $mb.ForwardingSMTPAddress
}

Remove-PSSession $exchangeSession
Again this is meant to be run line by line and not at as one script. It also includes a second loop to iterate through all mailboxes again. The script outputs the forwarding addresses to make sure everything is configured correctly.
Don’t forget your mailbox in the list. The service in the next step will notify you via email, and I miss those emails regularly if I don’t set up the forwarding.
8 Use the SharePoint Online Provisioning Service to deploy demo data
By now, the deployment of the app catalog should be ready. Check the central administration if the SiteCollection is created. Make sure the tenant is configured to use it as it’s app source by going through the same steps as above. You won’t be able to create a new app catalog. Instead, you will be redirected to your new one, if everything worked correctly.
The SharePoint PnP Provisioning Service
“The SharePoint PnP Provisioning Service lets you add samples, templates and solutions to your Office 365 tenant. The service provisions content and configuration for site collections, sites, and tenants as documented in each sample, template and solution. We strongly recommend deploying to a test tenant so that you can carefully analyze the results before deploying to your production tenant. This is an open source community hosted service, so there is no direct support from Microsoft from standard support channels for this service or for the contents of samples, templates, and solutions.”
That’s the official description you should read carefully at https://provisioning.sharepointpnp.com/home/contentPage?contentPageId=ServiceDescriptionLong. I mean really understand it, not like all the EULAs you skip through usually! Learn more about the service in this PnP video.
https://www.youtube.com/watch?v=vwn9HpMlYT4
Samples and solutions I use
I deploy at least the Contoso Drone Landing and the SharePoint Starter Kit from the Samples tab and the Microsoft 365 learning pathways from the solution tab. The deployment of all three samples can be done in parallel. Just open up the service three times in your browser. The provisioning sends a notification email as soon as it finished the deployment. If you followed all the steps like described you should have configured all the prerequisites for the examples and should get a positive message within the next 30-45 minutes.
The Microsoft 365 learning pathways solutions is often the first one ready. If you don’t know it yet, I encourage you to start using it right from the start. It really helps with users that see Office365 for the first time as it provides the training content they need in a guided way you can configure. Check out this video for more details.
https://www.youtube.com/watch?v=5lbmEHt1ITA
9 Install PnP PowerShell on your machine
If you are an experienced Office365 dev, the PnP PowerShell is already a no-brainer for you. For all of you starting, please check out this unbelievable toolset before you invite your users to the tenant. Follow the steps at https://docs.microsoft.com/en-us/powershell/sharepoint/sharepoint-pnp/sharepoint-pnp-cmdlets?view=sharepoint-ps to install the module and make sure to set up the credentials as described at https://github.com/SharePoint/PnP-PowerShell/wiki/How-to-use-the-Windows-Credential-Manager-to-ease-authentication-with-PnP-PowerShell
Most of the time, I need the Get-PnPProvisioningTemplate / Apply-PnPProvisioningTemplate duo to roll out specific configurations to SiteCollections.
10 Create an org-wide Teams team for your users
I always create multiple teams or SiteCollection for a demo or test phase. In order to communicate with the users already in the new tools, an org-wide Teams team is the best way to get started. My welcome messages contain explanations, links to the learning solution from above and some tasks I want them to finish. For Teams adoption check out those two links: https://docs.microsoft.com/en-us/MicrosoftTeams/get-started-with-teams-quick-start and https://docs.microsoft.com/en-us/MicrosoftTeams/adopt-microsoft-teams-landing-page. If you need an update on how to run a perfect Teams introduction demo watch the following Microsoft Mechanics video from April 2019:
https://www.youtube.com/watch?v=CH2seLS5Wb0
Most of the time, the first task for my users is to fill out a Microsoft Forms form where I ask about experience and expectations that might be different than the general scope. If everyone fills this out, I also know that all can log in and use the service and we as a group are up and running.
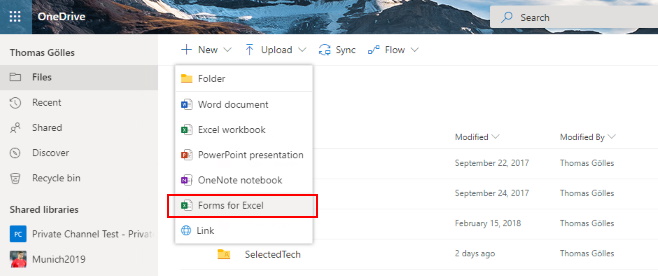
If you like to have your results in an Excel File in your OneDrive follow the steps at https://www.howtoexcel.org/general/microsoft-forms/
That’s my list of 10 things to do in order to create a nice demo or development environment for workshops or customers. If you have feedback or suggestions for additional steps, don’t hesitate and shoot me a tweet at @thomyg.
Finally, I also want to invite you to check out our SelectedTech podcast on YouTube and Buzzsprout
Enjoyed this post? Let's connect on LinkedIn:
Follow on LinkedIn →
